Jekyll2024-03-18T09:11:27-05:00https://mlo.io/feed.xmlMatt LobergSoftware Engineer passionate about DevOps and Open Source.
Quick Writing Tips2020-12-08T22:46:00-06:002020-12-08T22:46:00-06:00https://mlo.io/blog/2020/12/08/quick-writing-tipsWriting is something I see a lot of developers struggle with. They can write
complex algorithms, but when it comes to communicating with another person, they
struggle. I was a terrible writer. I’m still not great, but I’ve learned enough
over the years to get by. I wanted to share some of what I’ve learned over the
years.
Avoid Filler Words
The article that sparked me writing this post started sentences with “so”. This
bothered me because this was something I did in the past and have seen otherwise
smart people do. It doesn’t add any value to your sentence and can weaken the
meaning. I believe this stems from a lack of confidence, and this can be picked
up in your writing. The article was otherwise informative and useful, but lacked
authority in the delivery.
So I was using this tool the other day and I wanted to talk about it.
This also goes for other filler words. You’re not trying to write a paper that
has to meet a page requirement. Adding these filler words can weaken your writing
and how it’s received. Avoid words like “really”, “just”, and “very”.
Use an Active Voice
Passive voice in writing is when the subject of your sentence is acted upon by
something else. To make your writing more engaging, instead have the subject be
doing the action.
How do you spot passive voice? Look for words like “is” and “be” before a verb.
That may tell you if the sentence is using passive voice. This can be tough to
determine, so don’t be afraid to use a writing tool
to help you out.
A couple notes on passive voice, it isn’t always correct,
and in technical focused writing can be hard to accomplish at times. But by making
an effort to make your writing more active, it will make it more direct and
engaging.
Use Tools To Help Your Writing
I’m not a great writer. While I know these rules I’ve listed, it can be hard to
spot them in my own writing. When I’m focused on getting content down, I’m not
paying attention to these rules. That’s why I rely on tools to help me out.
write good
write good is my favorite out of this list.
I run it before I publish any blog posts. I also use the Visual Studio Code extension
to check any documentation I’m working on.
alex
I use alex to catch any potentially insensitive writing.
It doesn’t change the meaning of my writing and makes it more inclusive.
Grammarly
You’ve probably heard of Grammarly, but it’s become
something I use frequently. I like the ability to set goals and audience in a
document so I can make sure I’m coming across how I want to be. For everyday
writing, the combination of write good and alex works, but when I want to
sound professional, I reach for Grammarly. At time it feels slightly overpriced,
but has been useful to me. If you’re looking for free options, stick with the
tools listed above.
Note: This is not a paid advertisement or an affiliate link. These are my honest
feelings on the product.
Write Better
Even if you’re not an English major or struggled with English in school, these
tips and tools should help you start writing better. At the very least, please
stop using “so” to start sentences.
]]>Debugging With Git Bisect2020-08-05T09:59:00-05:002020-08-05T09:59:00-05:00https://mlo.io/blog/2020/08/05/debugging-with-git-bisectI’ve been fixing a lot of regressions in the project I’ve been working on. I’m
new to the codebase, so it often takes me a little bit to figure out where the
issue is. One tool that I’ve been relying a lot on to help me is git bisect. I
hadn’t used git-bisect much before this
point, so I kept finding myself having to look up how to use it every time. By
writing this post, I hope to cement the usage of and hopefully have to look up
how to use it less.
If you haven’t used (or even heard of) git bisect, it allows you to find a commit
that introduced a bug. You do this by giving it a non-working commit and a working
commit. It will then checkout different commits to determine where the bug was
introduced. This process can either be manual, where you tell it if the commit
is working or not, or automatic by giving it a script to run.
Practice Makes Perfect Better
To help us learn git bisect, we’ll use an exercise repo.
This one uses Python, but there are others
if you want a different language.
To start a bisect you’ll first need to know both a working and non-working commit.
We’ll use HEAD as our bad commit. To find a good commit, use git log --oneline
to list out your commits. If you want to filter that down between dates, use
git log --after="2018-06-30" --before="2018-07-03" --oneline. Find one that you
think works with git checkout 4d83cf and verify it works. Once verified, checkout
back to where you were with git checkout -.
Now that we have our commits identified, we can start the bisect.
git bisect start HEAD f0ea950
This will checkout to a commit, which we then need to tell git-bisect if it’s
working or not. In the exercise repo, we run python get_pi.py.
Bisecting: 250 revisions left to test after this (roughly 8 steps)
[5c6fb09b319ae1f2e09933afce65e825d8c72c77] commit number 251

➜ python3 get_pi.py
3.57
In this case, the output isn’t correct, so we’ll tell git-bisect that this commit
isn’t working or “bad” with git bisect bad. We then repeat this process.
➜ git bisect bad
Bisecting: 124 revisions left to test after this (roughly 7 steps)
[c65f54597261771201b900cfa0ccd9da520eb93f] commit number 126

➜ python3 get_pi.py
3.14
Here our output is correct, so we’ll tell git-bisect that this commit is working
or “good” with git bisect good. Repeat this process until it determines which
commit introduced the bug.
326f68a558501a6f44d7685c2c1795794bac09b5 is the first bad commit
commit 326f68a558501a6f44d7685c2c1795794bac09b5
Author: Radovan Bast <bast@users.noreply.github.com>
Date:   Fri Mar 29 16:02:52 2019 +0100

    commit number 137

get_pi.py | 8 ++++----
1 file changed, 4 insertions(+), 4 deletions(-)
git-bisect will checkout this commit for us where we can start to debug and fix
the regression. Once we’re done with our bisect, we can run git bisect reset.
Automate It
Using git bisect manually can take some time and is also prone to user error
(entering git bisect good instead of git bisect bad). git-bisect also has an
automatic mode where we can pass a script that it will check against. This isn’t
always an option depending on the bug or codebase.
Using our exercise repo as an example, let’s use the example from the README.
Start the bisect the same as before git bisect start HEAD f0ea950. Instead of
running the script and telling bisect if it’s working or not, we tell it to run
our test script.
git bisect run python3 test.py
If we did everything right, we should get the same result as before.
tl;dr;
git-bisect is a convenient way to find a commit that introduced a bug. Once we have
a working commit identified, start the process with
git bisect start HEAD [working]
Now we can either run our test manually and tell git-bisect if it’s working or not
git bisect good # code is working
git bisect bad # code is not working
Or if we can have it run automatically with git bisect run [script].
git bisect run phpunit tests # run our unit tests
It will then identify the commit the bug was first introduced in. Finish the
bisect with
git bisect reset
]]>Using Private Go Modules2020-04-14T12:48:00-05:002020-04-14T12:48:00-05:00https://mlo.io/blog/2020/04/14/using-private-go-modulesWe’ve started to write some microservices in Go. In our PHP applications we use
Satis
hosted on S3 to share common libraries. As long as you can access the S3 bucket,
you can install the packages. In Go this was a little more complex.
We use a self-hosted GitLab instance, so I’ve tailored these steps for that. But
the same thing should work for private GitHub repositories as well.
Setup
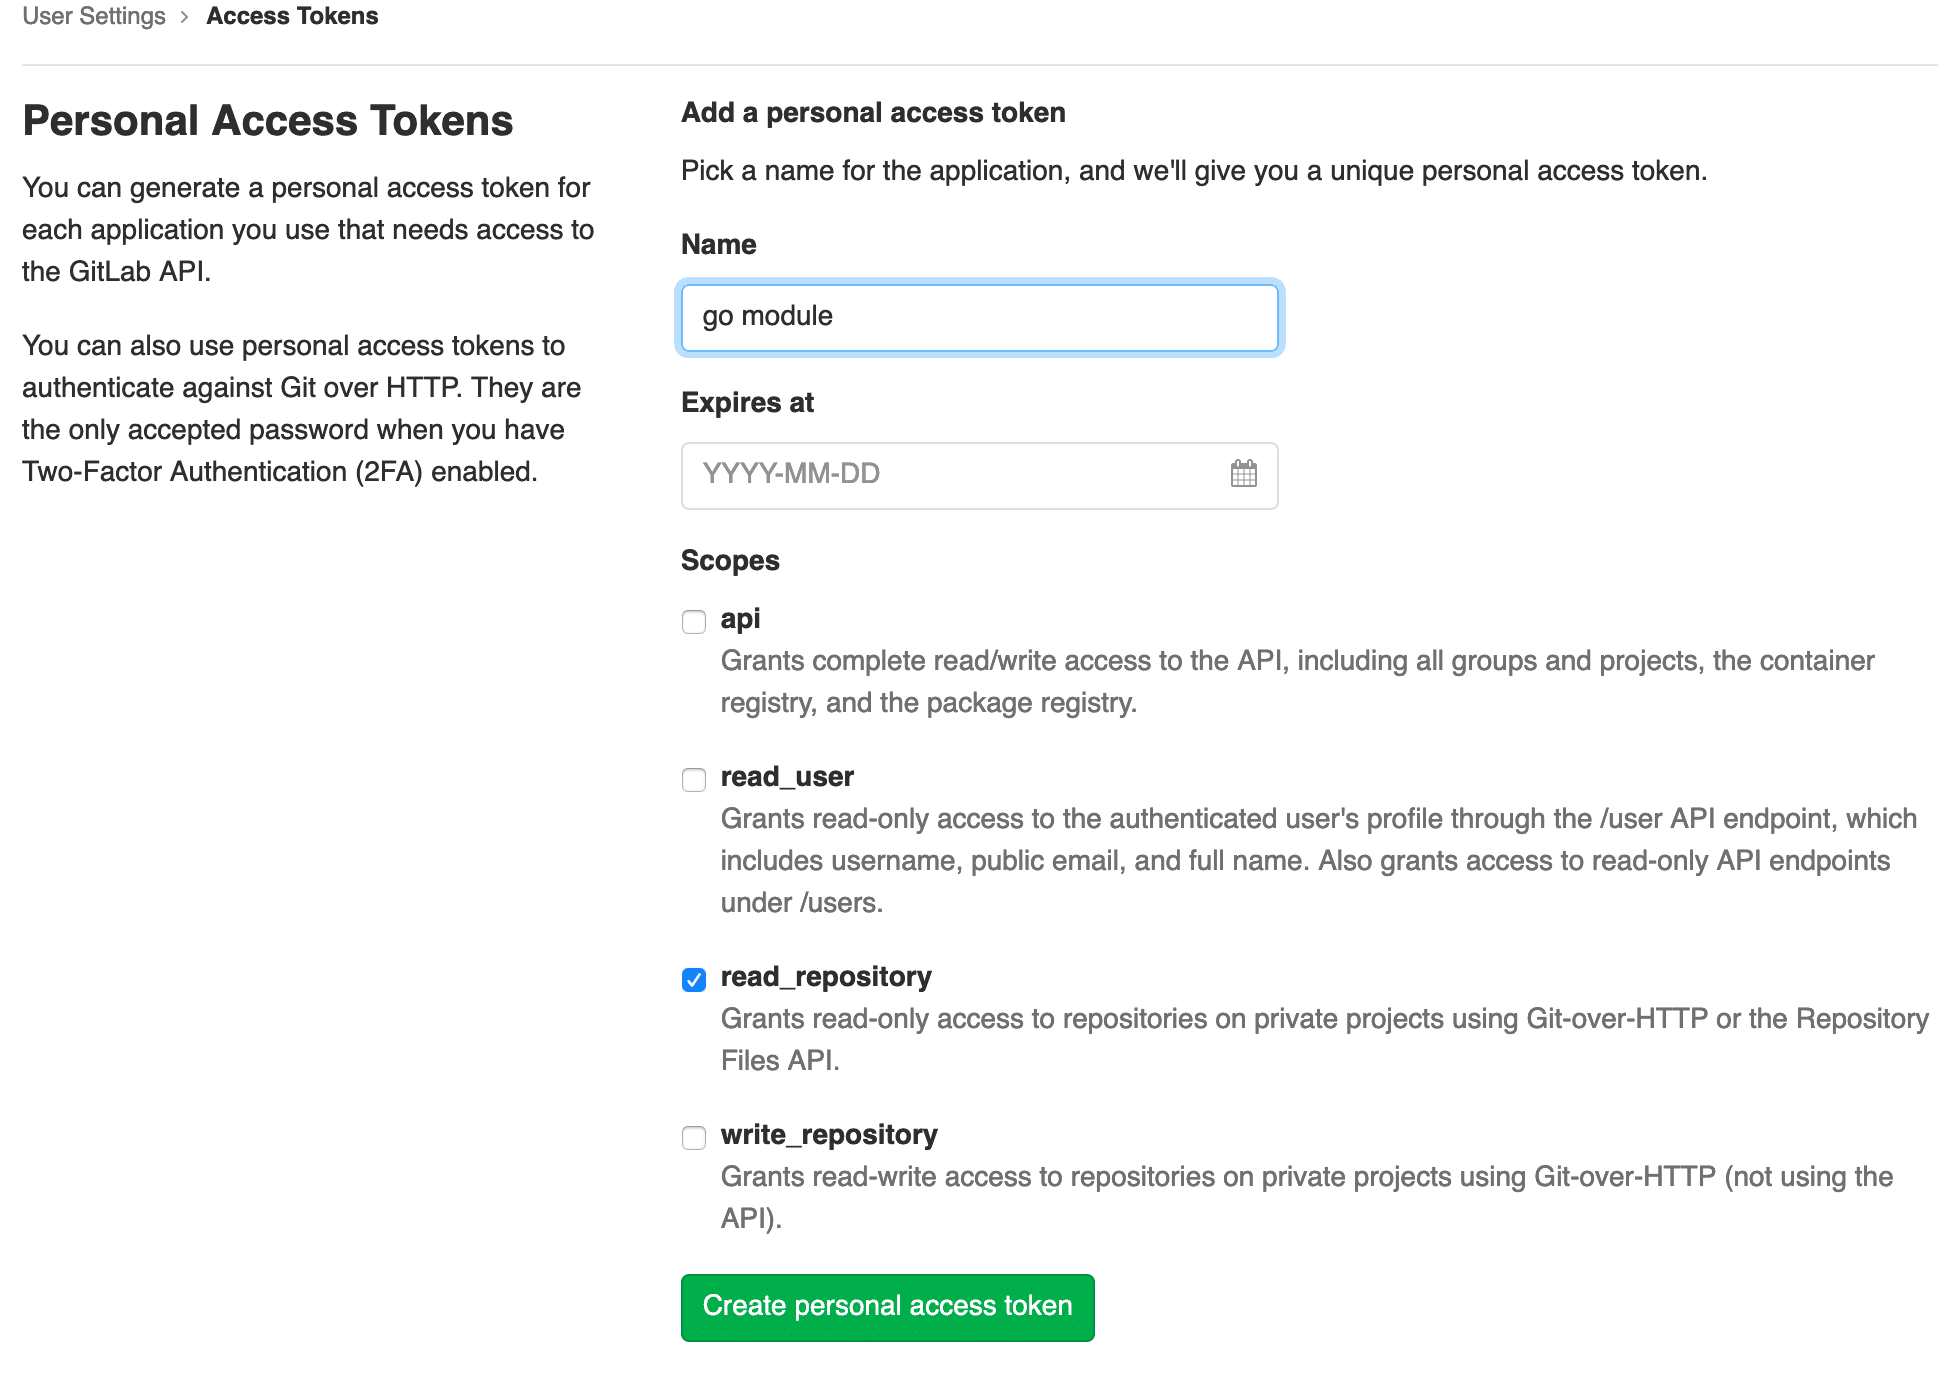
The first thing you’ll need to do is to create an access token. This token should
have both the read_repository scope. If you are using this on a local machine,
you may need to also add the write_repository scope if you’re using HTTP to
access your repository.
There’s a couple options for fetching Go modules from private repositories. The
most common way I’ve seen recommended is using git config url."".insteadOf "".
This works, but more elegant solution is using a ~/.netrc file. This file
defines automatic logins for ftp, but other programs have also adopted it,
including Git.
Replace gitlab.company.com, USERNAME, and TOKEN with your values. Now when
you push or pull via HTTPS in Git, it will use that information to login you in.
This is why you need the write_repository scope for local purposes.
This will also work with GitHub, Bitbucket, or GitLab.com.
machine github.com login USERNAME password TOKEN
One final thing that you’ll have to do is set a GOPRIVATE
environment variable. This contains a comma-separated list of module prefixes.
Save this value to your ~/.bashrc or ~/.zshrc.
export GOPRIVATE=gitlab.company.com
Now you can run go get gitlab.company.com/go/pkg and start pulling private
modules.
Docker
To allow for installing private modules in a Docker image, we use build arguments
and create the ~/.netrc file mentioned above.
Here is what our Dockerfile looks like.
FROMgolang:1.13-alpineASbuilderARG GITLAB_LOGINARG GITLAB_TOKENWORKDIR /app# Allow pulling private modulesRUN apk add --no-cache git
RUN echo"machine git.petfinder.com login ${GITLAB_LOGIN} password ${GITLAB_TOKEN}"> ~/.netrc
# prevent the reinstallation of vendors at every change in the source codeCOPY go.mod go.sum ./RUN go mod download && go mod verify
# Copy and build the appCOPY . .RUN go build -o bin/app .
FROM alpine:latestCOPY --from=builder /app/bin/app /appRUN chown nobody: /app
USER nobodyCMD [ "/app" ]
Then when we build the Docker image we pass the arguments. Make sure you’re using
a token with only the read_repository scope otherwise changes could be pushed
from the Docker container.
If you’re using Docker Compose, you can pass the args in the build option.
version:'3.7'services:app:build:context:.target:builderargs:GITLAB_LOGIN:${GITLAB_LOGIN}GITLAB_TOKEN:${GITLAB_TOKEN}image:company/appports:-8080:8080volumes:-./:/app:cachedcommand:go run ./main.go
Continuous Integration
The same methodology applies to Continuous Integration. Again, make sure the
token you’re using has only the read_repository scope. You don’t want to
accidentally push or give someone else access to your repositories.
We use GitLab CI, but the same should apply to other CI platforms like Circle
or Jenkins. In our before_script, we’re crafting our ~/.netrc file, pulling
values from CI/CD Variable configuration.
.golang:image:golang:1.13before_script:-echo "machine git.petfinder.com login ${GITLAB_LOGIN} password ${GITLAB_TOKEN}" > ~/.netrctest:unit:extends:.golangscript:make test
]]>Document Your APIs With OpenAPI2020-03-01T14:13:00-06:002020-03-01T14:13:00-06:00https://mlo.io/blog/2020/03/01/document-your-apis-with-openapiOver the past 5 years I’ve worked on an API first application full time. And
over those 5 years we’ve learned a lot about API design. In this post I’m going
to focus on documentation, how we approach it, and some of the tools we use.
Document First
Previous projects at our company used documentation generation tools.
These tools are useful because they tie into your code and don’t take a lot of
work to generate documentation. The documentation also updates as your make
changes in code. While there are positives to these tools, there are some drawbacks.
If you use a documentation generation tool, documentation comes after you write
code. A good API is designed before you write any code. Take time to think
through all the use cases. Sit down with the people that are going to be using
your API. Start documenting and iterating on that design.
After you’ve come to an agreement on the documentation, you have an artifact that
all parties can start building to. The backend team can start building out the
database models at the same time frontend or mobile developers build out their
integration. You can even use that documentation to generate mock data
to work with.
Another benefit is that your API doesn’t become tightly coupled to your database.
While this isn’t necessarily bad, it can cause issues later down the road if
your database schema changes.
Stick With The Standards
API documentation has come a long ways in five years. When we started working on
our API, the options were Swagger, RAML, Blueprint, SASS solutions, or to build
our own. Swagger had some trouble spots for us (or probably a lack of
understanding the specification) and the other systems were too complex. Against
our better judgment, we wrote our spec using a static site generator. It gave us
a nice documentation site, but when it came to tooling, we were on our own.
Had we stuck with Swagger from the beginning and not given up at the first issue
we encountered, we would be in a much better spot today. We still have endpoints
using our old documentation and making updates to those takes extra effort
because of it.
We learned our lesson and started writing our new API specification in OpenAPI.
Working with our spec has become much easier. By using OpenAPI, we can use
third party tools and libraries that support OpenAPI. You can automatically
generate SDKs, run validation, mocking data, and more.
Our Process
Before I talk about our process, we should talk about how we organize our
specification. We are potentially working on multiple features at once. To prevent
issues with merge conflicts, we split up our specification files and stitch them
together. To give you an idea, here is the basic setup of our spec directory.
spec/
    _base.yaml # Contains the base structure, info, and common schemas
    animals.yaml # Contains endpoints and schemas related to animals
    internal/ # Contains files for internal use endpoints
        users.yaml # Contains endpoints and schemas related to users
Here is our _base.yaml file. This contains the structure and basic components
that most endpoints use.
# _base.yamlopenapi:"3.0.2"info:title:Awesome APIdescription:Description for the awesome APIversion:"1.0.0"servers:-url:https://api.example.com/v2-url:http://api.localhost/api/v2description:localx-internal:truetags:-name:Animaldescription:Endpoints for animals-name:Userdescription:Endpoints for user managementx-internal:truepaths:{}# other files will get merged herecomponents:responses:Error:description:Error# rest of responseschemas:# Common schemasPagination:type:object# rest of common schemas
Then we create a file for each collection of endpoints. These files contain
path and components.
# animals.yamlpaths:/animals:get:operationId:animals.list# rest of the speccomponents:schemas:Animal:type:objectproperties:# rest of the schema
To get a single file, we use a npm module
that I wrote. It deep merges files matching a pattern and outputs to a single
file.
When we get requirements for a project we’ll start writing the spec. During this
we’ve found a UI to be useful, so
we’ve built one into our stitcher. Passing the --watch flag will reload the
UI when it detects changes.
We store our specification in our API codebase. This allows us to version our
documentation with our API. It also has the benefit of being able to use merge
requests to discuss and approve the proposed (or changed) specification.
Linting
The OpenAPI specification can be a little hard to start writing. How can you make
sure what you’re writing is valid? We use a linter! We were using Speccy, but
switched to Spectral. It validates
the specification and does some checks for best practices.
We have a step in our continuous integration pipeline that validates our
specification is valid, making sure we’re always shipping a quality specification.
Publishing
When looking to publish your OpenAPI specification, there are tons of
options. One of the last steps on our
continuous integration pipeline is publishing a UI to an S3 bucket. Now anyone
can view the documentation without having to run the UI locally.
We have both public and internal endpoints. Our stitcher tool use to take care
of excluding files when creating the spec. But we’ve found a better way to
do this with another npm module.
OpenAPI allows for custom tags starting with x-. Anything that has an
x-internal tag is removed from the final specification.
Documentation is hard. External documentation is even harder. It’s easy to
forget to update as your code changes. To prevent this, we integrate our OpenAPI
specification to our functional tests. When we test our endpoints, we use
validators to make sure what’s
returned, matches what we’ve documented.
If you want to start writing a spec with little to no knowledge, checkout
Stoplight Studio or other GUIs editors.
These assist in the process of writing endpoints and model without needing to
be familiar with OpenAPI.
For a list of other OpenAPI compatible tooling, check out OpenAPI.Tools.
]]>JekyllConf 2019 - Deploying Jekyll to AWS2019-09-22T13:08:00-05:002019-09-22T13:08:00-05:00https://mlo.io/blog/2019/09/22/deploying-jekyll-to-awsThis site has been using Jekyll since 2011 and hosted
on AWS since 2014. During that time I’ve learned a lot about the ins and outs
of using Jekyll and static sites in AWS. In this talk, share what I’ve learned
since moving to AWS and walk you through deploying your Jekyll site to AWS.
]]>Using UUID Client IDs in Laravel Passport2018-08-17T00:00:00-05:002018-08-17T00:00:00-05:00https://mlo.io/blog/2018/08/17/laravel-passport-uuidUpdate May 6th, 2020: Laravel has released Passport 9.0, which supports
UUIDs out of the box!
There have been solutions such as forking Passport and changing to a UUID. I would
recommend not taking this approach because forks have a history of becoming
unmaintained.
Luckily, we can make this change without modifying any of Passport’s code. Using
model listeners,
we can hook into the client’s life cycle and make the changes we need.
Migrations
First we need to modify the migrations that Passport provides to make the changes
at the database level. This is done by adding Passport::ignoreMigrations() to
AppServiceProvider@register and then publishing the migrations with
php artisan vendor:publish --tag=passport-migrations. Once we have the migrations
published, we need to edit any client_id field to be a uuid type.
// in the create oauth clients migration$table->uuid('id');$table->primary('id');// everywhere else referencing client_id$table->uuid('client_id');
Hey! Listen!
Now that we’ve made our changes to the database, we need to generate UUIDs when
a client is created. This can be done by using the ::creating model event listener.
Let’s add this to our AppServiceProvider@boot method.
I’m using the Ramsey UUID package, but you
could use any other package or method for generating a UUID. You’ll also notice
that incrementing is set to false. By default, Eloquent will cast id fields to
integers, so you may end up seeing this output if you don’t add that line:
Personal access client created successfully.
Client ID: 0
Client Secret: ZHywkvb0EPg0fYcxbdAlYLWhVSK0IHjoy5dW1j3B
Password grant client created successfully.
Client ID: 0
Client Secret: NykgD7a94EBCnz0owASEaFz8tQKo6T7KBJGOX2YU
We’ve got our clients saving an auto-generated UUID, but what about when fetching
a client? The ID will still be cast to an integer. Using model event listeners
again, we can have it not cast to an integer. Add this to your
AppServiceProvider@boot method.
With just a few lines of code, none of which overwrites base Passport code,
we’ve got UUID client IDs instead of auto-incrementing IDs.
]]>Composer Version Alias Hack2017-12-23T00:00:00-06:002017-12-23T00:00:00-06:00https://mlo.io/blog/2017/12/23/composer-version-alias-hackWith the release of Symfony 4 last month, we’ve slowly been seeing package
maintainers update their packages to support the latest version of Symfony
components. If you are a package maintainer and haven’t done so, you should
check out my guide for supporting multiple versions of Symfony.
What happens if a package you use doesn’t support Symfony 4? You can always
fork the repo, add the version constraints and open up a pull request. Often,
maintainers are happy to accept your pull request and create a new tag for it
in a couple days.
What about a package that isn’t active and could take months for them to update?
You could fork it and use your fork in your project, but I’m not a fan of doing
this. You could end up with a lot of forks that become stale.
With flex not requiring all of Symfony, you might be able to get away with
having a few packages being 3.4. The only difference between 4.0 and 3.4 is
removed deprecations.
What if it’s a common package like YAML or Console? What if it’s another common
package that has a lot of different version requirements like
php-parser? I ran into this last week and it didn’t look like the
packages I was wanting to use were going to get updated anytime soon.
Enter the Composer Version Alias hack. This hack allows you to require a version
of a package as if it were another. Example:
{"require":{"symfony/yaml":"4.0.2 as 3.4.0"}}
This is saying that our version 4.0.2 will be imported as 3.4.0. Now any package
that requires Symfony YAML version 3, will work because we are aliasing our
installed version to 3.4.0.
This hack isn’t ideal. It may not work 100% of the time and can cause upgrading
to be annoying (because it requires the full version). If you find yourself
needing a package really quick, it can be a lifesaver.
]]>Advance Jekyll2016-11-15T00:00:00-06:002016-11-15T00:00:00-06:00https://mlo.io/blog/2016/11/15/advance-jekyllThis is the final part in a three part series on static site generators.
In the previous post I talked about Jekyll, a popular static site
generator written in Ruby. In fact, it’s what this site has been using for a
while. During that time, I’ve picked up some tips and tricks that I want to
share with you today.
The things you find in here are not best practices, absolute truths, or even the
best way to do things. With development, there’s a thousand different ways to do
something, these just happen to be what I found works.
GitHub Pages offers a free solution for hosting a Jekyll site on a platform you
probably already use. This works wonderfully for the majority of sites out there.
However, because it is a hosted solution, there’s limitations to it. You can’t
run custom plugins and the build process has to be completely done through
Jekyll. The power of Jekyll is really unlocked when you deploy to another
platform that you have control over.
Because Jekyll outputs static files, the options for where you can deploy your
site are endless. You could manually upload the files to a web server you own or
even automate that process with a tool like rsync.
This site is hosted on Amazon S3. It was a product I was already using
and I don’t have to worry about security, updates, or any of the other things
you have to with a normal web server. They have
static website hosting built in, but it can be a bit
confusing to get setup. Instead, I recommend using a tool called
s3_website. Not only does it manage S3 static hosting
configuration, it can upload your site for you (and only the files that changed),
use AWS CloudFront to distribute your website, manage HTTP cache control and
gzipping, and much more. Obviously you don’t want to commit your AWS access or
secret keys, so either keep the file local, or commit an example copy of it
without those values.
Manage Your Dependencies
As you dive deeper into customizing and streamlining your Jekyll site, you’ll
find yourself using lots of different tools. Using a dependency management tool
like Bundler can help easy that and provide consistency between any
different environments you may be using.
To get you started, here is a starting Gemfile for Jekyll.
source'https://rubygems.org'gem'jekyll'
You can also target a specific version of Jekyll.
source'https://rubygems.org'gem'jekyll','~> 3.3'
Make sure you also commit your Gemfile.lock file to manage specific versions
of dependencies.
Stop Excluding Files
We’ve added two more files to our directory that we probably don’t want to be a
part of our final site. If we add more tools like Gulp or Yarn,
we would need to add more files to exclude from our site. Jekyll allows you to
define the source of your site. By default this is the current directory (.),
we can change that with the source option. Either on the command line or even
better, our _config.yml file.
source:site
This directory can contain only files that Jekyll uses to generate the site and
you won’t have to worry about extra files getting into your build.
Plugins
Now that we have all the boring stuff out of the way, we can start getting to
the cool parts. Arguably one of the most powerful features of Jekyll is it’s
plugin system. There are plugins out there to
generate sitemaps, RSS feeds,
add SEO tags, and more. There’s even support for some plugins on
GitHub Pages.
There are a couple different ways to install plugins in Jekyll. The first is to
list it in your _config.yml.
gems:-jekyll-sitemap
If you’re using Bundler, you can use the jekyll_plugins group and those will
automatically be registered with Jekyll.
You can find out all about Jekyll plugins at their documentation.
Custom Liquid Tags
Liquid is a pretty powerful templating language. With Jekyll we can
build on top of that and add custom tags. This is done by as a Jekyll plugin,
all we need is a little Ruby.
As an example, I want a tag that strips out all extra whitespace. To do this,
I create a file called _plugins/spaceless.rb.
Filters are applied via pipe ({{ profile.jpg | asset_url }}).
Assets
I remember when Jekyll didn’t support Sass or CoffeeScript out of the box,
luckily that’s all changed and adding Sass to your site is easy. Concatenating
CSS/JS, optimizing images, and adding in third-party assets aren’t as easy. If
Jekyll out of the box works for you, that’s great. If you need something a little
bit more advance, read on. I’m going to go over two different options.
Gulp or Jekyll Assets.
Gulp
Gulp is a build system for JavaScript. I’ve personally used it for other
projects and I love it. I’m not a front-end developer by any means, but it’s
really easy to use. Unfortunately, there’s a million different ways to configure
your build. If you’re looking for a place to start, I would check out
generator-jekyllized.
I was never able to get a build pipeline that I liked in Gulp, so I don’t have
much insight here, but there are tons of sites out there that have done this.
Jekyll Assets
I was never able to get a build pipeline in Gulp that I liked, so I decided to
go with a pure Ruby option of Jekyll 3 Assets. If you’re not
comfortable with NodeJS or Gulp, but need something better than what Jekyll
provides out of the box, this might be a good solution for you. Jekyll Assets is
an asset pipeline for Jekyll 3 using Sprockets, the same system Rails uses. With
the support for Sprockets, I was able to switch over to Jekyll Assets from my
old Gulp build in about 10 minutes.
Testing
We have this badass site. It builds all our assets for us, we’ve customized it
with some third-party plugins and even a few of our own. It’s perfect, how do we
make sure it stays that way? We can test it!
What can we test? First we can test that everything with Jekyll is ok. Let’s run
the doctor command.
$ jekyll doctor
We should also test that all the links in our site are going to resolve to a
working page. To do this, we use the html-proofer gem. This will
scan all links in HTML pages and make sure they return a real page. I’ve had
this catch links that were broken on old posts.
$ jekyll build
$ htmlproof [site-dest]
For most sites, this is probably sufficient. Let’s say you have a site that uses
a lot of custom plugins or logic in your templates that you want to test. We
could use a tool like Selenium or a lighter tool like
PhantomJS. I used CasperJS for this site.
(see below) It offers some really useful tools specific for testing. Here is
an example test:
casper.test.begin('Homepage',7,functionsuite(test){casper.start('http://localhost:4000/',function(){test.assertTitle("Matthew Loberg · Software Engineer");test.assertNotVisible('#sidebar','Sidebar is not visible');test.assertElementCount('.post',5,'There should be 5 posts on the first page.');this.click('.older');}).then(function(){test.assertUrlMatch(/page2/,"We are on the second page of posts.");test.assertElementCount('.post',5,'There should be 5 posts on the second page.');this.click('.sidebar-toggle');}).then(function(){test.assertVisible('#sidebar','Sidebar should be visible after clicking hamburger.');test.assertElementCount('#sidebar .social ul li',2);}).run(function(){test.done();});});
You can check out the full test for this site on GitHub.
Additionally you could do some CSS regression testing using a tool like
BackstopJS, Wraith, or PhantomCSS.
Update 10/25/17: With ChromeDriver now supporting headless mode, I switched
to Nightwatch.js. The documentation feels lacking at points, but
it’s very powerful and easier than Casper to write tests.
Automated Deployments
One of the things I really missed about GitHub Pages was the ability to push a
change to my site and have it automatically built. With s3_website, I need to
remember to build and deploy my site. If I’m away from home, I can’t make a
change with GitHub’s interface and have it automatically build.
Or can I?
With a tool such as TravisCI it is possible to have automatic
deploys on push. First let’s create a .travis.yml that just builds and tests
our site.
language:rubysudo:falservm:-2.1cache:directories:-vendorenv:global:-TZ=America/Chicago# Makes sure posts are generated with the right timestamp-NOKOGIRI_USE_SYSTEM_LIBRARIES=true# speeds up installation of html-proofer-JEKYLL_ENV=productioninstall:bundle install --jobs=3 --retry=3 --path vendor --standalone --deploymentscript:-bundle exec jekyll build-bundle exec htmlproof build
Here we’re using a Ruby 2.1 Travis container to build our site. I’ve set a
custom install script that installs gems to vendor and then caches that
directory to speed up the installation process. For our test script, we build
the site and then run html-proofer against the build.
Travis has an after_script option that will run after a successful build. We
don’t want to expose our AWS access and secret key, so we need to add them as
encrypted variables. Then change our s3_website.yml to
load those from the environment instead.
Finally, we only want to run this on the master branch. Travis gives an option
to only run on certain branches.
language:rubysudo:falservm:-2.1cache:directories:-vendorenv:global:-TZ=America/Chicago# Makes sure posts are generated with the right timestamp-NOKOGIRI_USE_SYSTEM_LIBRARIES=true# speeds up installation of html-proofer-JEKYLL_ENV=production-secure:xxx-secure:xxx-secure:xxx-secure:xxxinstall:bundle install --jobs=3 --retry=3 --path vendor --standalone --deploymentscript:-bundle exec jekyll build-bundle exec htmlproof buildafter_success:bundle exec s3_website pushbranches:only:-master
If we make a change to our site using GitHub’s interface, it should
automatically build and push our site. Huzzah!
Wrapping Up
This is only scratching the surface of what Jekyll and static site builders are
capable of. If you have any useful tips or tricks you’ve learned with Jekyll,
please share them in the comments.
]]>Getting Started With Jekyll2016-01-27T00:00:00-06:002016-01-27T00:00:00-06:00https://mlo.io/blog/2016/01/27/getting-started-with-jekyllThis is part two in a three part series on static site generators.
In the first post I talked about what static sites are and a little bit about
static site generators. I talked a lot about Jekyll, which what we are
going to be talking about today.
Jekyll is a static site generator written in Ruby. It uses Markdown
(or Textile), and Liquid to generate a static site. It’s also
blog-aware, which means there’s a lot of cool features around blog posts such as
permalinks and categories. In fact this blog post you are reading right now, was
generated using Jekyll.
Installation
To use Jekyll, you’ll need Ruby, RubyGems, and a *nix system.
If you are using Jekyll 3 you need Ruby v2 or above. If you are using Jekyll 2,
you will need Ruby 1.9.3 or greater, NodeJS, and Python 2.7. Because Jekyll is
distributed as a Gem, installation is really easy.
$ [sudo] gem install jekyll
Creating a New Site
To look at what’s in a Jekyll site, we are going to create a new site using the
jekyll new command. This will setup some boilerplate code for a Jekyll site.
$ jekyll new myblog
$ cd myblog
$ jekyll serve
This will start a development server at http://localhost:4000.
The _config.yml file is the configuration file for Jekyll.
One of the cool things about Jekyll is that none of these files are required.
Even though this file holds the configuration for the site, there are enough
defaults that it can build the site without this file. In addition you can add
custom settings that will become global site variables.
Includes
The _includes directory holds any partials that can be included in your
layouts or pages. To do this, use the include Liquid tag. For example:
{% include footer.html %} will include
_includes/footer.html.
Layouts
The _layouts directory holds all the page templates for the site. Layouts are
chosen by the YAML Front Matter of a page. To inject the page content,
the {{ content }} Liquid tag is used.
Posts
Remember how I said Jekyll is blog-aware? The _posts directory contains all
posts for the site and will generate permalinks based on the file
name. The default will use the format
/:categories/:year/:month/:day/:title.html, but you can customize that using
_config.yml.
Assets
Your site won’t just be HTML pages, you’ll have CSS and possibly some
JavaScript. You could use just normal CSS or Jekyll has support for both Sass
and CoffeeScript. In the site generated for us, it has some Sass files. First
there is a _sass directory, which is our Sass partials directory. The we have
css/main.scss. If you look at this file, you’ll notice it has empty YAML Front
Matter. In order to process through Jekyll, files must include a YAML Front
Matter block. You can read more about assets at Jekyll’s docs.
YAML Front Matter
Before we talk about how to add a page to Jekyll, let’s talk about
YAML Front Matter. YAML Front Matter is a block of YAML that is
used for building the page. It can contain information such as the layout to
use, the page title, permalink, or any other custom settings or page variables.
Any page that contains Front Matter, will be processed by Jekyll. Otherwise the
file will just be copied over during build. Front Matter must be the first thing
in a file. It must start and end with three-dashed lines. Here is an example:
Now that we’ve covered what Front Matter is, let’s talk about creating some
content. First, let’s take a look at index.html. This is an HTML file, but
because it contains Front Matter, it will be processed by Jekyll and use the
default template. The HTML file can contain just HTML with Front Matter, but
it can also contain Liquid tags. Liquid is a templating language that
feels similar to Twig or Jinja. For example, if we want to list out all our
posts, we can do that using this block of code:
<ul>
{% for post in site.posts %}
<li><ahref="{{ post.url }}">{{ post.title }}</a></li>
{% endfor %}
</ul>
That’s pretty cool, but sometimes writing HTML for every page is lame. Luckily
we don’t have to as Jekyll supports Markdown and Textile. This will take
Markdown (or Textile if you so choose) and then convert it into an HTML file.
How awesome is that? You can write your blog posts in Markdown!
With content, you aren’t just limited to HTML or Markdown files. Any file that
contains Front Matter can use Liquid and be processed by Jekyll during the
build. For example, in the site Jekyll gave us, it has a feed.xml file that
creates an RSS feed from all the posts. You could also create a JSON file that
contains information about all your blog posts to do searching through
JavaScript.
Customization
I hope you’re getting a sense of how cool Jekyll is and all the stuff you can do
with it, but we’ve barely scratched the surface. There’s drafts,
collections, data files, pagination,
and variables that allow you to do some pretty cool stuff.
If that’s not enough for you, you can add plugins or even write your
own to really show how powerful Jekyll can be.
I’m not going to dig into this stuff in this post. If you are interested, part
three of this series will be about some more advance Jekyll features and tricks,
otherwise the Jekyll docs has a ton of information.
Deploying to GitHub Pages
Now that you’ve got a functioning Jekyll site that you can view with
jekyll serve, how do you get that deployed for the world to see? There’s a lot
of options here because it is just static files. You can drop them on any web
server. You can also create this advance script that will deploy your site
around the globe using Amazon Web Services every time you run git push (which
I’ll be talking about in the next post). Or you can keep it simple (and free)
and deploy to GitHub Pages. We’re going to be talking about deploying
an account/organization site, but you can also have a site for a
project as well.
Setting up a site through GitHub Pages is easy. All you have to do is create
a repository called username.github.io, push your code to the repository, and
wait for it to build (the first time can be slow).
This will host your site at http://username.github.io/. If you want to use
your own domain name, worry not, it’s really easy. All you need
to do is add a file called CNAME that contains your custom domain name. This
should not include the http: or any slashes (mlo.io not http://mlo.io).
Commit and push this file. Then you’ll need to add record to your DNS provider.
If you are using a subdomain, you can use a CNAME record. This is the
recommended option as it gives you the benefit of their Content Delivery Network
and any changes to the IP of the GitHub servers (which they’ve done) won’t
affect your site. If you can’t use a CNAME record, you can use an A record.
To get the current IP address and more information, please visit their
help page.
While GitHub Pages is awesome, free, and easy, there are some limitations and
potential downfalls to the service. The first is that you can’t run any custom
plugins, you can only run plugins listed on [this page][ghpage-plugins]. One
thing you’ll notice, is that at the time of writing GitHub Pages is only running
Jekyll 2.4.0. While this shouldn’t be an issue for most sites, it may cause some
inconsistencies between what’s built on your machine and what GitHub Pages will
deploy. Finally, the biggest issue for me with GitHub Pages in the past was
downtime. A couple years ago, my site would go down for hours at a time. I’m not
sure if this is still an issue or if they have improved their architecture to
prevent it from happening, but it was the reason why I moved my site to AWS.
Build Something Awesome
With all this new-found knowledge of Jekyll, I hope you build some cool sites or
migrate over your blog to Jekyll. Maybe you’re still not 100% sold on
the idea of a static site. In the next post, I’m going to go through some more
advance Jekyll features and hopefully show you that Jekyll is a lot more
powerful than you think.
Update 2/1/16: GitHub Pages just upgraded to Jekyll 3.0 along with a few
other changes to the service. You can view their blog post
for more information.
]]>Why Static Site Generators2016-01-13T00:00:00-06:002016-01-13T00:00:00-06:00https://mlo.io/blog/2016/01/13/why-static-site-generatorsThis is a 3 part series about static site generators and Jekyll in
specific.
What the hell is a static site generator? First we need to understand how most
web sites work. Most web sites you visit are dynamic sites, which means the
content is generated at request time. This could include calls to a database, a
third party service, or other processes that could take time to processes.
A static site is just static content (HTML, CSS, JavaScript). Nothing is
generated, no database calls are made. Static content is simply returned. That
means these sites perform better because serving static content is a lot easier
on the web server.
A static site generator builds those static files from different templates or
scripts and can make managing a static site a lot easier than having to update
each HTML page if you make a change to some layout element.
In fact, this site you are looking at is a static site. There is no database,
just static files. I’m using a tool call Jekyll, that I’ll be talking
about more in-depth in later posts.
Why Should I Care?
As a web developer, my personal site has gone through many different systems.
For a while it was a WordPress site, at a different time it was a custom built
application. A couple years ago I made the switch to Jekyll and I haven’t looked
back. I’m going to give you just 5 reasons why static sites and Jekyll is
awesome, although I think there are many more benefits than this.
1. No Servers
I think my favorite thing about how I’ve hosted my site since switching to
Jekyll is that I haven’t need to manage or maintain a server. I used
Github Pages for a while, and now I’m using Amazon S3 and
CloudFront. No having to worry about setting up a server and making sure it’s up
or Apache is working.
You could host your static site on your servers, but there are plenty of options
out there, where you don’t need to.
2. No Upgrades
I think one of the worst things when I had a WordPress site are the constant
updates. With Jekyll I don’t have any software on the server that I have to
worry about upgrading, and I don’t even need to upgrade Jekyll unless I want to.
3. No Security Worries
WordPress is always getting updates because of security vulnerabilities being
discovered. Or what about a custom application, who knows what security issues
could be lurking in there. Because Jekyll is just static files, there’s no
scripts that are ran on the server.
This also goes for server software. Because I’m not running my own server, I
don’t have to worry about making sure Apache or nginx or whatever other software
is update to date.
4. No Downtime
How many times have you seen an article featured on Reddit or Hacker News that
you visit and it’s unavailable because it wasn’t able to support the influx of
traffic. Or if something in your code breaks, or some configuration on your
server gets messed up, there goes your site. With static sites, handling that
influx of traffic is a lot easier and Apache can handle it a lot better than
dynamic sites where the issue is usually with the database.
If you use a service like Github Pages* or host your site on Amazon CloudFront
or some other CDN, you don’t even have to worry about making sure Apache or
nginx can handle that.
* There have been cases in the past where I have experienced downtime with
Github Pages, which is why I moved to S3 and CloudFront. Downtime usually only
last a couple minutes at most.
5. No Costs
Assuming you’re not counting your domain registration and you are using Github
Pages, hosting a site that uses Jekyll is free. Even with my site now that uses
S3, CloudFront, and Route 53, I only pay $2.50/month and that’s including all
the other things I have on S3.
Potential Downfalls
But Matt, I can’t switch my site over to a static site. My site needs to have…
1. Comments
Scroll down to the bottom of this page, what is that you see? Comments?!? How
can it be? Thanks to a really awesome service called Disqus, you can
have comments using just JavaScript.
2. Real Time Content
An old version of my site used to pull in my Twitter feed and also my
Last.fm tracks. When I switched over to Jekyll I was able to pull in
this data with JavaScript. I’m not sure how viable this option is as your API
keys may need to be in JavaScript or you could hit API limits. Do you really
need this information pulled in on your site? It is nice, but with all the other
benefits of static sites, you could probably get by without this.
3. Admin UI
With WordPress it was nice being able to login from anywhere and write a new
post or continue working on a draft. You can’t possibly do that with a static
site generator? Wrong! With my current site, I’m able to use Github’s UI to
create new files or make changes to existing files. If you’re using Github Pages
or a deploy system like my site, any changes that are make will automatically
get built and deployed. I’ve even seen iPhone and Android apps that allow you
to do the same thing assuming your site code is in a Github repo.
Making The Switch
I hope I’ve at least interested you in static site generators. In the
next post I’m going to
walk through setting up a Jekyll site and Github Pages.